To add a picture you'll have to create a content area with a content editor. Remember to upload the pictures to Assets before adding them to the content area.
Do this when you want to add a picture to a content area:
- Choose Edit from the top of the content area.
- A content editor will appear on the screen.
- Go to the spot where you want to add the picture and choose Add picture.
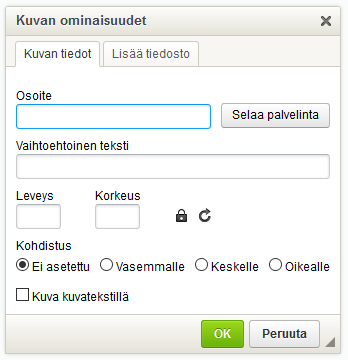
- Picture's features will appear on the screen. Choose Browse files.
- Assets will open up. You can now choose the picture you want by double-clicking it with the left mouse button.
- You can now resize the picture from Width and Height. You only have to change one of these, and the program will do the rest.
- Press OK when you're ready.
- Remember to Save before you exit the content editor.
Editing and changing the picture
Do this when you want to edit the features of the picture:
- Choose (while you're in the content editor) the picture you want to edit by clicking the right mouse button. Choose Features.
- Picture's features will appear on the screen. (explanations below)
- You can now edit the features.
- Press OK when you're ready.
- Remember to Save before you exit the content editor.
Picture's features:
- Address
You can write down the link of the picture, or find the picture from Assets by choosing Browse files.
- Alternative text (alt-text)
If the picture can not be shown for some reason, this text will be shown instead of the picture.
- Width/Height
You can resize the picture from Width and Height. You only have to change one of these, and the program will do the rest.
- Adjustment
You can adjust the picture to the left, center or right.
- Picture with a caption
You can add a caption to your picture after pressing OK